Collaboration in spaces and chats
This section covers the following topics
Spaces and chats overview
Spaces facilitate structured formal collaboration on SignSpace around any topic, idea, subject, project, or workflow. Spaces are used to document discussions, negotiations or decision making process, which can be finalized by electronic document signing.
Spaces consist of a flow of different activities:
- Text message
- Text message with file attachments
- Task - contains a form for entering a title, description and assignees
- Signing request - contains a form for entering a contract name, description, files for signing and signatories
- Poll - contains a form for entering a voting question with the voting options, as well as attaching files for voting.
When you get email notifications (for instance to join a space or to sign a document), most of them lead to some activity on one of the spaces.
Each activity appears as a separate white block in the flow of the space. Use these activities, to create custom workflows based on your organization needs.
This is a space:

It is the widest block on SignSpace screen:

Activities in a space are listed in one level flow.

But it is also possible to use separate branches in the same space. Separate branches in the space are created, if you reply inline to a specific message.

Chat is a communication channel, separate from spaces. All of the informal private communication on SignSpace happens in chats. You can have instant private conversations for a quick brainstorm or information exchange quickly without overloading spaces with detailed information.
As spaces have a flow of activities (messages, signing requests, tasks), chats have a flow of messages. One easy way to distinguish between a space and a chat is to notice that each space activity is a separate white block, while all chat messages are located on a unified white background. Messages are listed on one flat flow without branches or levels.
This is a chat:
Individuals or groups can participate in chats. To ensure privacy, once a chat is started, new participants cannot be added to the chat.
Navigating and searching spaces and chats
All your spaces and chats are listed in the Home list. The list may have one of the two formats: grouped by space/chat or ungrouped.
When Home folder is selected on the sidebar, the list is grouped by space/chat:

When other sidebar folders are selected (for instance Received, Sent, Starred), the list shows each activity or message separately in an email inbox format.

The list is marked by attention indicators for your convenience:
- A grey dot means there is a new unread activity. This indicator will disappear once you read the activity.
- A blue dot means there is a new unread activity that is of importance to you. For instance, you have been mentioned by your name. This indicator will disappear once you read the activity.
- A yellow dot means there is an activity assigned to you. This indicator will disappear when you complete the assignment.
Attention indicators in the grouped list look like this:

Attention indicators in the grouped list for an expanded space look like this:

Attention indicators in the ungrouped list look like this:

The list always has a search bar at the top. You can search for a keyword or a tag in spaces and chats. As you start typing, the autosuggest will provide the options.

The applied search criteria is visible on the blue line. The search results of the home view will be displayed divided into groups.
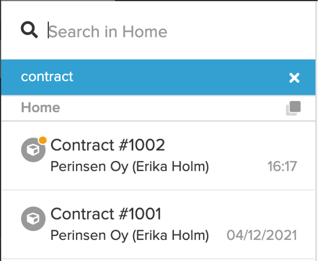
Inbox and other folders allow filtering out content according to your current work focus.

Groups shortlist allows filtering out content where a particular group is participating.

People shortlist allows filtering out content where a particular person is participating.

If your Groups or People shortlist is long, use a local search to find a specific group or person.

Some spaces might get big, so there is Space content functionality to help you get a better overview of what is in the space. To open the Space content column, click on the right icon in the space header.

Space content appears as one more column on the right side of the space details view.
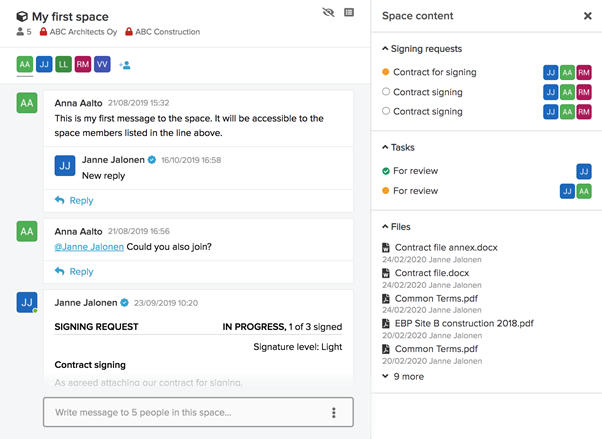
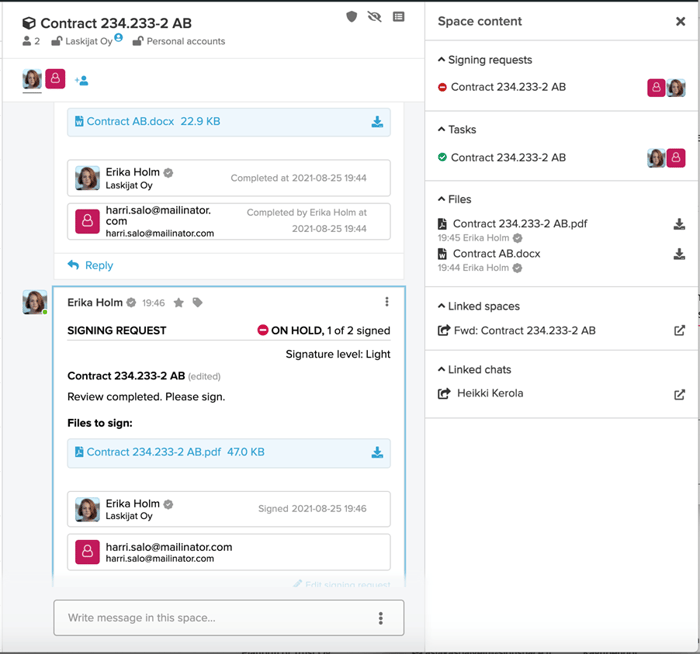
To close off the Space content column, click again on the right icon in the space header.

If you are using a smaller screen, you might like to minimise the left sidebar to have more screen space available for the Space content. Typically when you start using SignSpace the default sidebar is always expanded.

But if you click the icon at the bottom of the sidebar, your sidebar will be minimised.

Keeping your mouse over the sidebar for a couple of seconds will temporarily expand the sidebar for you to choose the needed menu item.

If you would like to use the expanded sidebar again, click the > icon at the bottom of the sidebar.

Create a new space
A person creating a space is called a space owner. A space owner creates a new space by posting the first activity (a message, a signing request, a task, a poll) to the initial space members. Space members can be individuals or groups.
Click the + New button. To start a space with a message, choose Message.

Recipients will be the initial space members (more may be added later at any time). The Subject of the message will also be used as the space title. Fill in the form and click Send.

Since this message will create a new space, the bottom bar of the form contains a link Security settings. These settings will apply to the created space. They are fully editable at any time in the created space, and this is just a quick access to them. Clicking the link will open the following pop-up:
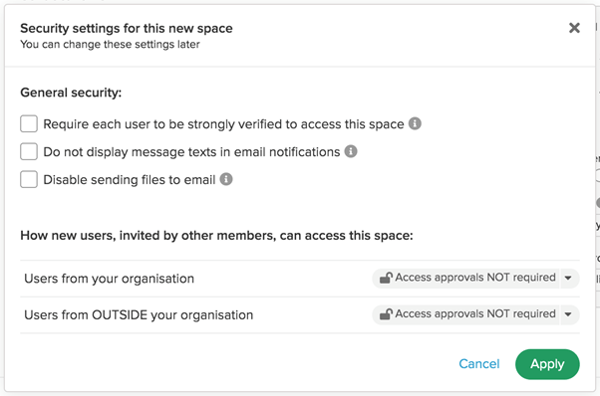
Detailed security options are described in the Space security section of this page.
As you fill the form, it is saved in drafts, so if you click X instead of Send, the form is closed, but your changes are saved and you can access them by following the toast message link to the Drafts folder.


If you click Discard in the new message form you will need to confirm that you do not want to save the changes and the message draft will be deleted. 
After clicking Send in the new message form, a new space will be created and the message will be posted in it as the first activity.

The space members will get invited to the space by email notifications. In the space they can read and comment on the posted activity, create new activities or take actions as assigned, for instance to sign a signing request or complete a task.
By clicking the + User icon on this line the space owner or existing space member can add more space members at any time (space owner approval might be required for new members depending on the space security settings).

Space ownership
When you look at the space title or the space member list, there are blue icons indicating space ownership. Initially the user who created a space and the organization represented by this user are the owners. Ownership means that authorized administrators from the owner organization can access the space and all content in it.

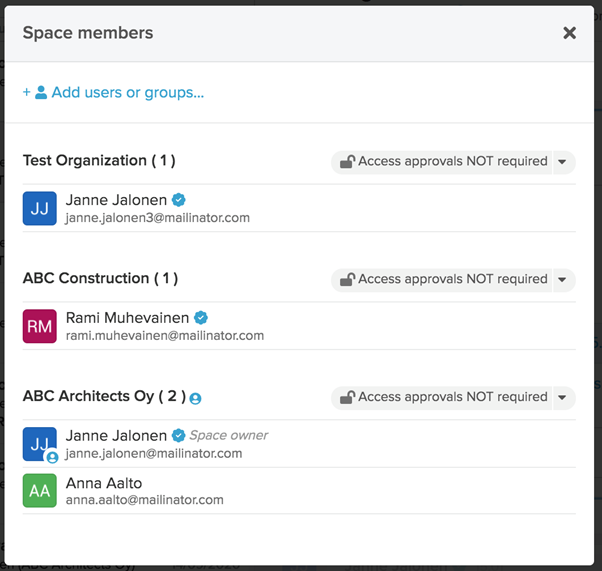
Current space owner can share ownership with other users and their organizations. As long as the new owner is in the same organization, ownership is granted to the user only. However, sharing ownership to a person outside your organization must be done with care, since new organization’s authorized admins will also be granted access to this space.
To allow a new owner, click the User-with-a-shield icon (marked blue next to the Delete icon).

You will be asked if you are certain that you would like to share this space ownership with another organization (because this user is outside of your organization).
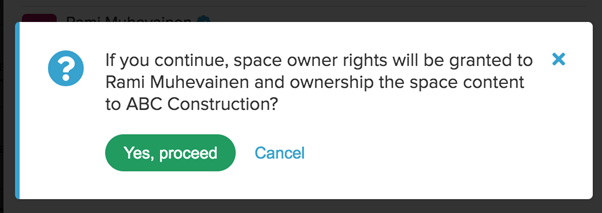
If you proceed, this user and this organization will be granted owner rights to this space and its contents.

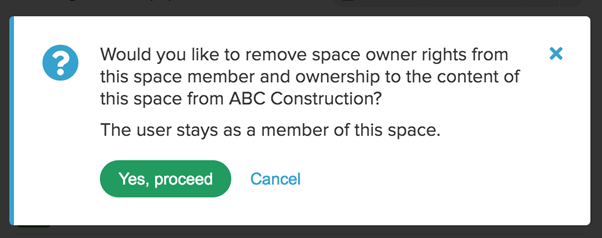
This action can be undone by clicking the Crossed-out-user icon (marked blue).

You will have to confirm that you want to remove owner rights from this user and his organization.
Space security
Space has advanced security controls available to the space owner. Space security settings are accessible under the shield icon in the space heading top right corner. An empty shield means that all security settings are set to basic defaults. When at least one setting is changed from the basic defaults, a checkmark is visible on the shield icon.


Clicking the shield icon opens the following basic default settings:

The first section of the settings window allows space owner to protect content of the space:
- From being viewed by unverified users. If the first checkbox is checked, only individuals with strongly verified user identities will be able to view the space and its files. If strong identity verification is required, user will be asked to go through the identity verification service provided by Signicat. It covers identity verification via electronic IDs for Finland, Sweden, Norway, Denmark, Estonia, Latvia, Lithuania.
- From sharing space message content over emails. If the second checkbox is checked, users get email notifications about new activities in the space, but message text preview is not included. The users have to go to SignSpace in order to read the new message content.
- From sharing space files over emails. If the third checkbox is checked, sending files from the space by email will be disabled. In particular, signing documents without being a registered SignSpace user will not be allowed in the space (because in the case of signing without registration, signed files need to be distributed to non-registered users by email).
The second section of the settings window allows the space owner to automate how newly invited users will be allowed to access the space. A space owner may decide, if new users added by existing space members need to be approved in order to join the space. Approval settings are indicated by an open or closed lock next to the organization name. By default all the new users added by existing space members do not require additional space owner approval and the setting looks like this:

If approval is required, the setting looks like this:

The summary of this security information is also available in the space header. The open or closed icons next to each account name indicate if additional space owner approval is required for new users from this organization to be added to the space once existing space members invite them.

Clicking any of the account names opens the space member list, which also provides a quick way to change new member access settings for any of the accounts.
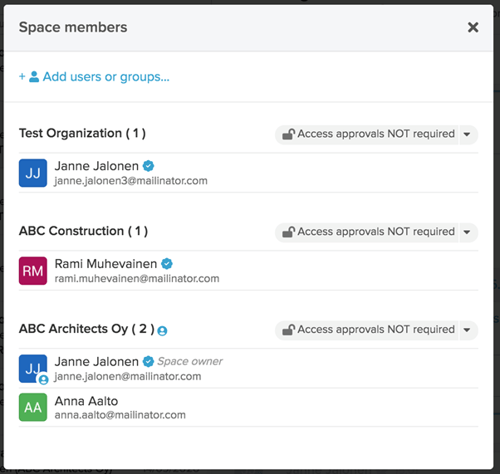
If space owner approval is required, when an existing space member tries to add a new person to the space, an access request to join a space will be posted in the space for space owner to take action. New member will receive an email notification to join the space only after the space owner’s approval.


Collaborate in a space
When you get invited to a space, you will be notified in SignSpace Home view as well as by email.

When you join the space, you may reply to existing messages, post new messages, create signing requests and tasks.
To reply to an existing message, click Reply.

Write your reply in the inline reply bar and click the Send icon.

Your message will be posted as a reply and you as well as others may keep replying to the same branch of messages.

If you would like to post a separate new message in this space (and start a new branch), use the reply bar at the bottom of the screen.

Enter your text, attach files if needed and click the Send icon.

The message is posted as a stand alone message in the space.

You can also post a signing request or a task in an existing space by clicking the Signing request or the Task link above the reply bar or by using the 3 dots icon to open the context menu.


A signing request or a task form will open accordingly. Fill in the form and post a signing request or a task.
With a signing request you can invite people to sign documents, for example a contract.

With a task form you can assign something to do to a person or a group.

Start a chat
If you would like to chat with one person, listed in the People shortlist, click on that name. The Home list is automatically filtered to show only the content involving this person. The chat with that person will appear at the top of the Home list. If this is the first time you want to chat with that person, the chat will be empty. If you have chatted previously, old messages will be pulled up.

If the person does not appear in the People shortlist or you would like to chat with multiple participants, click on the sidebar + Chat link at the top of the People shortlist.

An empty chat window will open.

Start typing the names of the people you want to chat with. The auto-suggestion list will help you add people. New people can be invited by email address.

You can also include a group by typing a group name.

People and groups that you add to the chat may be from different organizations.
Make sure to add all the needed members, because new members may not be added to the chat after the first message is posted.
When you have added all the chat members, switch to the reply bar at the bottom of the screen, write your first message and click the Send icon.

The chat is created and your first message is posted in it.

Chat in a group
When you belong to a group, you can have an internal chat with members of that group.
In the Groups shortlist, click on that group name. The Home list is automatically filtered to show only the content involving this group. The internal chat of this group will appear at the top of the message list.

Linked spaces and chats
By default spaces are stand-alone entities when they are created from the + New button. But spaces may be linked to each other or linked to a chat. The process starts in an existing space by forwarding a message to a new space or a new chat.
Click on the Forward this message to a new space or Forward this message to a chat in the context menu of any activity in a space.

If you choose Forward this message to a new space, a new message form will open in a modal. The space title will be prefilled, the original activity contents will be copied, the original activity files will be attached, but the recipients field will be empty. Correct and fill the message fields as needed, add new recipients for the linked space and click Send.

A new space is created, which has a status of a linked space.

For you the spaces appear linked. In the original space you will see a link to the newly created linked space.

From the linked space navigation in the space heading you may access the original space.

Only users who have access to both spaces, will see these links as you do. People who only have access to one of the linked spaces will not see the links and will not be able to access the other space.
If you choose Forward this message to a chat, a new chat will open and the original activity content will be copied to the reply bar. At the top of the new chat add recipients with whom you would like to chat about this, fix the message content as needed and click the Send icon.

A new chat is created (if you never chatted with these recipients before) or an old chat is continued (if you chatted with these recipients before).

For you the chat and the space appear linked. In the original space next to the original task which you shared, you will see a link to this chat.

In a chat a specific separator indicates where the linked chat started.

Only users who have access to both - the space and the chat - will see these links as you do. People who only have access to one of the items will not see the links and will not be able to access the other item.
Use tags
If you would like to mark space activities, you can add tags to them by clicking the tag icon at the top of the activity. Tags can be applied to messages, signing requests and tasks. Tags do not have a predefined hierarchy, however the autosuggest list provides you with the list of similar tags which are already in use. 
Tags that you add are visible only to space participants from your organization. Anyone from your organization can delete them or add additional ones.
When you click on an existing tag, you can select to search for it (the tag search will be carried out in your current view) or delete the tag.

If the space activity, which is tagged, has one or more attached files, the tags applied in the space will also be visible in the files list. Any further changes to such tags in the space (deleting or adding new ones) will reflect in the files view as well. Any changes to such tags in the files list (deleting or adding new ones) will also apply to the space(s) where the file is attached.
@mention users
When composing an activity in a space or writing a message in a chat, you may use the @ sign to mention a user in a text field. An auto suggestion list will open where you can choose the person.


If the mentioned user is already a member of the space, the user will be notified about this mention with attention indicators and an email notification. If the mentioned user is not part of the space, before sending the message you will see a notification that this user will be invited to the space.

If you choose to proceed and send the message, an access approval might be needed depending on the space security settings. In that case an access request will be sent to the space owner to allow the user to join the space. Once the mentioned user is added to the space, the user will be notified in SignSpace and by email.
If the mentioning is happening in a chat, only the chat participants may be mentioned, since chat does not allow adding new participants. The mentioned user will be notified about this mention with attention indicators and an email notification.
Hide spaces and chats
Use hiding to clean up your SignSpace of unneeded content. To hide a space or a chat click Hide icon in the top right corner of the space or chat header.

This action applies only to your view and does not impact how other space participants see it. This action also is not deleting any space or chat contents. They are only moved to the Hidden folder and no longer appear in other sidebar folders.

To restore a hidden space or chat go to Hidden folder in the sidebar, select the space or the chat and click Unhide icon in the top right corner of the space or chat header.

