Registration, accounts, users
This section covers the following topics:
Account and user type overview
To start using SignSpace you need to register an account. There are two types of accounts on SignSpace:
- Organization accounts
- Personal accounts
Personal and organization accounts
Personal accounts are accounts for individual users, who use SignSpace for personal needs. You get a personal account when you first register to SignSpace yourself.
Organization accounts are accounts registered on SignSpace to represent organizations identified by a business ID or company number.
There are the following ways to get an organization account for a user:
- Register your organization on SignSpace. When you are the first representative of your organization on SignSpace, you register a personal account first and then register your organization on SignSpace.
- Register as a new user on SignSpace by following the organization email invitation sent to you by the admin user of your organization.
- Already having a SignSpace personal account, accept the organization email invitation sent to you by the admin user of your organization.
- Already having a SignSpace personal account, request to join your organization.
There are two roles in any organization account:
- Admin user - organization admins in charge or managing the account and inviting new users
- Basic user - any organization member
Organization admin user determines your user type when inviting you to join the organization account. If you ask to join the organization yourself, when your request is accepted by default you will become a basic user, but organization admin user can change the user type later.
Free trial and subscription types
Organizations may choose between the limited plan or one of the paid plans.
The limited plan is free of charge and it allows to sign requests created by others, to collaborate in spaces and chats, to have the signed content archived for your organization. However the limited plan does not allow creating your own signing requests for electronic document signing.
All paid plans include full digital signing functionality and all other SignSpace functionality. Each new organization registered on SignSpace selecting a paid plan, gets first 4 weeks free to try it. Chosen paid plan continues to apply after the end of the 4 weeks.
Paid plans are of different sizes:
- Small - provides all SignSpace features for an unlimited number of users and includes 60 signatures for a fixed monthly fee of 6€. Additional signatures are charged separately if they exceed the included amount.
- Medium - provides all SignSpace features for an unlimited number of users and includes 600 signatures for a fixed monthly fee of 49€. Additional signatures are charged separately if they exceed the included amount.
- Large - provides all SignSpace features for an unlimited number of users and includes 1500 signatures for a fixed monthly fee of 99€. Additional signatures are charged separately if they exceed the included amount.
- Enterprise - provides all SignSpace features for an unlimited number of users with a custom pricing, which is agreed by contact SignSpace sales team.
Personal accounts do not have plans and allow only limited digital signing functionality without creating signing requests.
Sign up as a new personal user
Go to www.signspace.com and click on the Join SignSpace button.

Fill in the registration form and accept the Terms of Service, Data Processing Agreement and Privacy Policy. Then click Continue.

Switch to your email inbox to verify your email address.

Check your inbox (and Spam folder) for an email from SignSpace. Click the verification link provided in the email message.

You will be asked to sign in to SignSpace.

Once signed in, you will see an email verification confirmation. Click Continue.

Since you registered as a personal user you will be prompted a suggestion to register your organization account or join an existing organization.

If you choose to proceed with this registration, you will start the process described in the following section of this user guide.
If you choose to do this later, you will land in the main SignSpace user interface with a SignSpace welcome message.

Register your organization
To register an organization on SignSpace, you must already have a SignSpace account. Once you have registered as a personal user or are already a personal user, go to the accounts menu in the sidebar.

Select Join / Register organization.

Fill in the organization’s details and click Find organization.

You will receive a confirmation that such organization is not registered. Click Register organization.

Provide the email address you would like to associate with your organization. This email will be used for SignSpace email notifications, such as new signing requests.

If you choose to add a new email, you will be asked to do email verification. You will receive an email message with a verification link. Go to your email inbox, click Finish registration and then you will be directed to continue this organization registration flow.
If you choose one of the suggested emails, there are a couple of checks that the SignSpace system will do.
First, it will check if you already associated this email with another organization account on SignSpace. In which case you might see the following notification. It means that you will be using the same email to receive email notifications from two separate organization accounts on SignSpace, but inside SignSpace you will have a new ID so that signing requests can reach you in your newly added organization account. The new ID is shown on the blue background. Make sure you inform your partners to use this ID and not your email when they want to connect to your new organization account on SignSpace.

A second SignSpace check is done in case you selected a personal SignSpace account email to be connected to your new organization account. In that case SignSpace checks if this personal account already has some content (messages, signing requests and so on). If you already have some content under your personal account, you will see this message. Choose if you would like to move the existing content to the new organization account and click Continue.

Now you are starting the organization registration process. Accept the general terms of use and click Continue in the first step of the form.

Provide your organization contact details. Click Continue.

Select one of the subscriptions.

Review the selected plan.

Provide the invoicing details (invoicing details are not required for the CAMPAIGN plan) and place the order.

Your organization is registered and your email is connected to the organization account. You are the admin user of your organization. You can invite other users to your organization and manage the organization account.

Customise your organization logo
First of all, for other users to recognize your organization account, change the organization avatar to your organization logo. Go to the top of the sidebar.

Mouse over the default icon. You will see a dashed line and Edit. Click on that area.

A modal will open where you can update your organization logo. Click Change picture.

Select your logo from your PC and upload it. You will see an updated organization logo. If everything looks ok, click Save picture.

The modal will close and in the sidebar you will see updated organization logo. All your organization account users will see the organization logo like this. Only you and other admin users can change it.

Onboard your organization
For your whole organization to start using SignSpace, invite new users to your organization account. This is done in the User management page. To access the User management page, go to accounts menu in the sidebar and click on the Gear icon (the right side of your organization account line).

You will land in your organization details Overview page. In the sidebar switch to the User management page.

On the User management page click + New user.

Add your colleagues’ email addresses, select user type and click Send invitation.

Email invitations will be sent to them to complete the registration process.
Register with organization invitation
Once your organization admin user invites you to join the organization account, you will receive an email notification. Click Start using service.

If you do not have a SignSpace account yet, fill in the registration form and click Continue. If you already have a SignSpace account, do not register again. Use the sign in link in the blue notification at the top of the registration form.

In the success message screen, click To service.

You will be asked to sign in once again.

You will have to confirm that you accept the organization invitation - choose whether you would like all your existing content to be moved to the new organization account and click Accept invitation. If you choose a separate personal account and accept the invitation, you will have two SignSpace accounts under one sign-in: one belonging to the organization and one personal. If you choose Go back option, you will remain with a personal account, not linked to your organization.

After accepting the invitation, you will land in the main SignSpace user interface with an organization account welcome message from SignSpace.

Accept organization invitation
If you already have a personal account and your organization admin user invites you to join the organization account with the same email address, you will receive an email notification. Click Start using service.

Sign in to your SignSpace account.

Confirm that you agree to accept the organization invitation - choose whether you would like all your existing content to be moved to the new organization account and click Accept invitation. If you choose Go back option, you will remain with a personal account, not linked to your organization.

If you choose to move all your existing content to the organization account, when you accept the invitation, your personal account will turn into an organization account. All your personal messages, spaces and groups will be also transferred to the organization account.

If you choose a separate personal account and accept the invitation, you will have two SignSpace accounts under one sign-in: one belonging to the organization and one personal.

Join existing organization account
If you registered a personal account and your organization is already registered on SignSpace, you can ask to join it. Click the accounts menu in the sidebar.
Select Join / register organization.

Fill in the organization’s details and click Find organization.

If the organization is already registered on SignSpace click Request to join.

Provide the email address you would like to associate with your organization. This email will be used for SignSpace email notifications, such as new signing requests.

If you choose to add a new email, you will be asked to do email verification. You will receive an email message with a verification link. Go to your email inbox, click Finish registration and then you will be directed to continue this flow.
In case you selected a personal SignSpace account email in the above step, SignSpace checks if this personal account already has some content (messages, signing requests and so on). If you already have some content under your personal account, you will see the following message. Choose if you would like to move the existing content to the organization account and click Continue.

Now your request is sent to the admin users of your organization for approval.

Once approved, you will receive an email notification.

Your personal account will turn into an organization account. If you selected not to move the existing SignSpace content to the organization account, you will have two accounts under the same login: one is your new organization account and another is your personal account with the old content.
Sign in with SignSpace Key app
On the sign in screen under the password input field you can see a link QR code instead of password. Once you start using the SignSpace Key app you can use this link to sign in into your SigSpace account without the password. To do that, enter your email address and instead of entering your password click the link QR code instead of password.

You will see this screen on your desktop.

Open your SignSpace Key app on your mobile, click the Scan QR code area at the bottom of the app screen and scan the QR code from your desktop screen. On the desktop you will be signed in to your SignSpace account.

If you are not using the SignSpace Key app yet, you can start using the app at any time. Click one of the app store buttons at the bottom of the sign in area.

If you are on your mobile phone, the buttons will lead you to the app store page for a selected device. Install the app and follow the setup instructions. If you are accessing the sign-in page on your desktop, the app store buttons will lead to the following page. Enter your email address and you will receive app install links to your inbox.

Open the appropriate app store link on your mobile phone to install the app for your device platform.
Personal settings
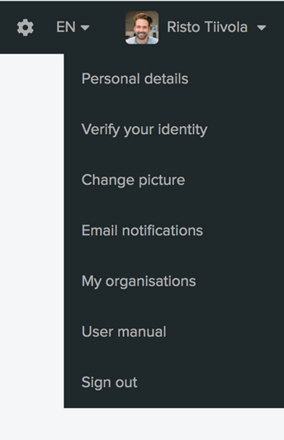
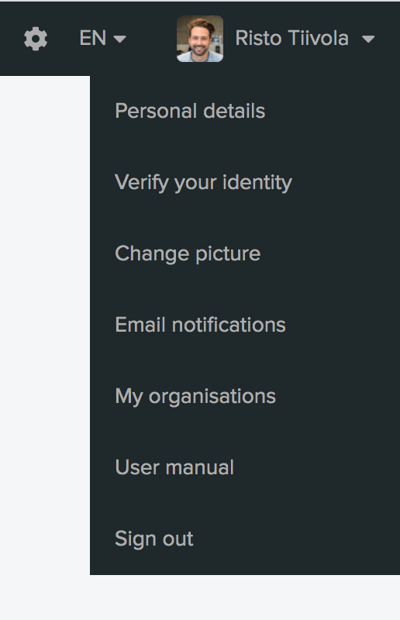
On the right side of the top bar you can change the language (English, Finnish and Swedish languages are available), access and manage your personal settings: Personal details, Verify your identity (visible if you have not done so), Change picture, My organizations (if you are linked to any). In the same menu, you may access the User guide and Sign out function. You may change your password on the Personal details page.
Verify your identity
To facilitate trust in the SignSpace platform users are encouraged to verify their identities. User with a verified identity has a blue badge next to the name. User without a verified identity has a grey badge.


When you click on your own grey badge, you will be provided with the option to verify your identity.

The same option is available from your personal settings.

The Verify your identity link will lead to this page first.

Clicking Verify identity will lead to the strong electronic identification, which is carried out via the verification service by Signicat. Identity is verified via electronic IDs for Finland, Sweden, Norway, Denmark, Estonia, Latvia, Lithuania. To verify your identity you will need your bank or mobile electronic ID credentials.

When you are back to SignSpace after the strong electronic identification, the shield next to your name will be blue.
Email notifications
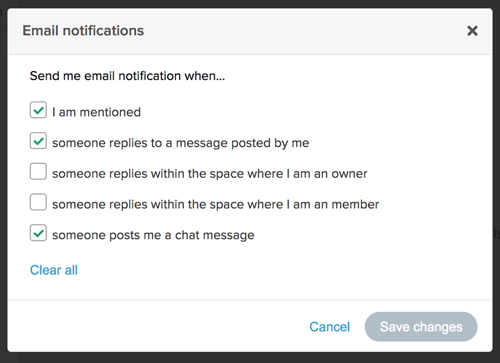
Email notification settings are available in the personal settings drop down menu.
Click the menu item to open a list of checkboxes, which allow you to control when SignSpace sends you email notifications.
Revoke SignSpace Key
When you install and set up SignSpace Key mobile app on your phone, digital signature keys are generated on your phone and they are used when you sign documents electronically. For security purposes you should always make sure that your phone is secured from other people having accidental access to it. Therefore when you are changing phones or if you lose your phone, it is very important to revoke the SignSpace Key from your phone. You can do that by contacting SignSpace customer service by phone 0600 301 339 (1,52 eur/min+pvm, weekdays 8:00 - 16:00) or email customerservice@signspace.com and providing your account email address for which you would like to revoke the SignSpace Key.
Authorisation to access organisation information
Trusted Admin user permission allows access to organisation information on SignSpace. Trusted admin has access to all the spaces owned by an organisation and can add and remove space/group members.
By default, no one has the Trusted Admin rights. The person who registers an account becomes the Main user. Main users can then create a new authorisation request for the Trusted Admin role (for themselves or for someone else in the organisation).
The process ensures that only the users authorised by the legal representative of the organisation can have access to all the information owned by the organisation.
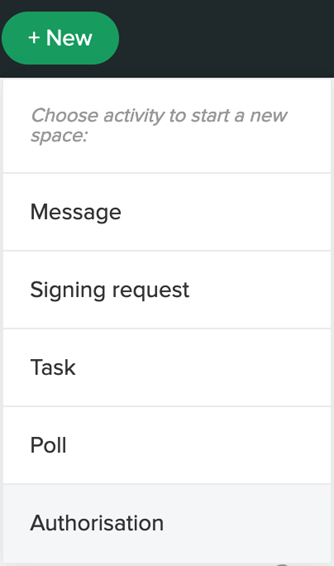
Clicking "Authorisation" under +New menu opens a pop-up to create a new authorisation. This option is visible only to Main Users of the organisation.
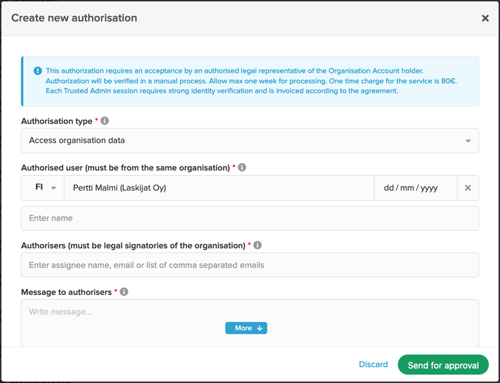
All fields in the authorisation request must be filled.
|
Field |
Description |
|
Authorisation type |
"Access Organisation Account data" is selected to apply organisation data access. |
|
Authorised user |
Name of the user who will be authorised to access organisation data. The user must be a member of the organisation. |
|
Country |
Nationality of the authorised user is needed to verify the identity of the authorised user. Verification is available for Finnish, Swedish, Norwegian, Estonian, Latvian and Lithuanian nationalities. |
|
Date of birth |
The authorised user’s date of birth is needed to verify the identity of the authorised user. |
|
Authoriser |
The authorisation request is sent for signing to the assigned person(s). The assigned person(s) must be a legal signatory or signatories in case 2 persons are required to sign together.
Authoriser’s authority to represent the organisation is verified manually from the business registry once the authorization request has been signed. |
|
Valid till |
Validity period of the authorisation must be defined. |
|
Message to authorisers |
This message will be displayed to the authorisers in the email invitation and on the authorisation request in SignSpace, and it is also visible to the SignSpace Authority Verification group. |
After clicking “Send for approval”, you will be asked if you are OK with the extra cost for manual verification of the legal signatory. “Yes, I accept” will create a new authorisation request. Email notification is sent to the authoriser(s) and a new space is created for the request, related activities and conversations.
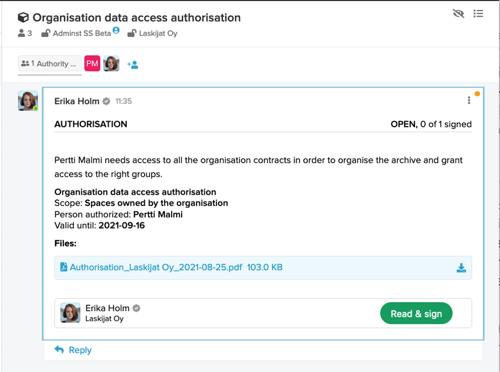
Once the authorisation request is signed by the authoriser(s), its status changes to IN VERIFICATION and an automated verification task is assigned to the Authority Verification group, which is a SignSpace back-office function. The authoriser’s authority to represent the organisation legally is verified manually by the group. Processing of the verification may take max. one week. Once the verification is completed with positive outcome, the authorisation request status changes to APPROVED and an email notification is sent inform about the approval.
If the authoriser(s) do not have the required authority, the authorisation request status changes to REJECTED and an email notification is sent to the request creator and the signatories.
An authorisation request may be cancelled at any time from the menu in the top right corner.
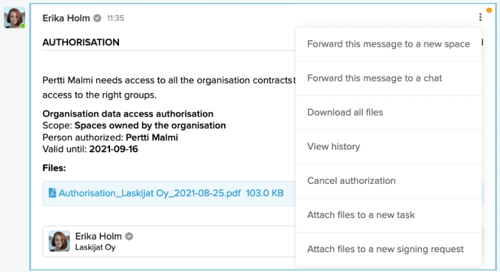
The history report contains a list authorisation related events and is available from the menu in the top right corner.

Access to organisation information
An organisation’s information stored on SignSpace can be accessed by users with the Trusted Admin permission. (See the “Authorisation to access organisation information” section on how to grant Trusted Admin permissions).
Clicking the Trusted Admin icon on the organisation’s list opens the Trusted Admin session, which is required to the access organisation information.
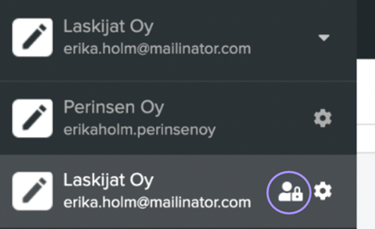
Two-factor authentication is required for each Trusted Admin session. In addition to sign-in credentials, the user is asked to verify their identity using their bank ID or mobile ID. Date of birth, as given in the authorisation request form, is verified against the national identity number.
Successful identity verification opens a Trusted Admin session. The yellow bar on the top of the page indicates that the session is active.

IMPORTANT: When a Trusted Admin session is active, the user acts on behalf of the organisation and is not a user of their own account.
Trusted admin has the following rights:
- Read access to all spaces owned by the organisation
- Read/write access to all groups created under the organisation account
- Right to add/remove space members, both users and groups
- Right to add/remove space ownership to/from users and groups
Trusted admin does not have the rights to:
- Access spaces which are not owned by the organisation
- Create new spaces or groups
- Post new activities or messages to an existing space
- Access chat conversations
- Administrate signing requests or polls
TIPS:
- If you want to participate in space activities, add yourself to the space member list and participate in the space using your own account.
- If you need to edit a signing request or a poll, add yourself to the member list of respective space, grant space ownership to yourself and participate in the space using your own account.
- If you want to use both the trusted admin session and your own account at the same time, you may sign in to your account using another browser or open an incognito session in the same browser.
